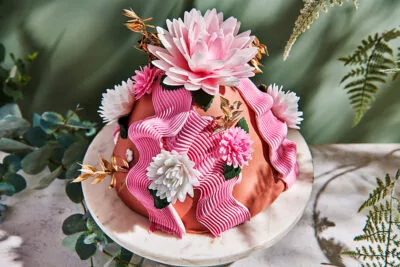


Geo hexagon cake
Do you want a challenge while baking? Then get started with this geo hexagon cake! Incredibly stylish with flowers, all kinds of fondant colors and a delicious filling.
What you need to make your geo hexagon cake:
Ingredients
- 400 g FunCakes Mix for Sponge Cake Deluxe
- 400 g FunCakes Mix for Buttercream
- 50 g FunCakes Mix for Royal Icing
- FunCakes Flavor paste of your choice
- 1kg FunCakes Fondant - Bright White
- 750 g FunCakes Fondant - Raven Black
- 400 g FunCakes Gum Paste
- FunColours Gel Pink
- FunColours Gel Peach
- FunColours Dust Cherry Red
- FunColours Sparkle Dust Glitter Gold
- FunCakes Edible Glue
- 500 g unsalted butter
- 440 ml of water
- 6 eggs (approx. 300 g)
Necessities
- FunCakes Magic Roll-Out Powder
- FunCakes Bake Release Spray
- Wilton Decorator Preferred Deep Round Pan Ø10cm x 7.5 cm
- Wilton Decorator Preferred Deep Round Pan Ø15cm x 7.5cm
- Wilton Decorator Preferred Deep Round Pan Ø20cm x 7.5cm
- Wilton cooling grid
- Wilton Cake Leveler
- Wilton Comfort Grip Spatula corner
- Wilton Wide Glide rolling pin
- Wilton Perfect Height rolling pin
- Wilton foam pad
- Wilton flower drying rack
- Wilton Flower Stamen Assortment
- PME White florist tape
- PME Brown florist tape
- PME Green florist tape
- PME Cobblestone impression mat
- PME Geometric Multicutter Hexagon Small
- PME Ball tool
- JEM Black medium stamens
- Culpitt Floral Wire 18 gauge
- Culpitt Floral Wire 26 gauge
- FMM Impression mat
- FMM 5 petal cutter
- Silikomart Sugarflex Veiner Mini Flower
- Cutting pliers
- Small flat brush
- Rejuvenator
- Plastic insert case
- Block oasis wrapped in plastic wrap
Knead 400 g FunCakes gum paste and 100 g white fondant together. Divide into two pieces and color one part light pink and the other dark pink with the FunColours Gel.
Tip! Prepare the flowers a few days in advance so that they can dry thoroughly.
For the florets: cut an 18-gauge floral wire into three pieces. Take a piece of the gum paste/ fondant and roll a drop of it. Dip the iron wire into the glue and push the drop on it. Let this dry overnight.
Roll out your gumpaste very thinly on some Magic Roll-Out Powder and cut out the 5-petal cutter 2x for each rose. Put them under a plastic sleeve to prevent them from drying out. Place a 5 petal on the foam pad and go over the edge with the ball tool so that it starts to wave slightly. Coat the droplet on iron wire that you made earlier with glue and stick the flower around it. Skip 1 petal each time and then tape. Repeat this with the second layer. Finish all the florets in this way, put them in the oasis and let it dry for at least 1 day, preferably 2 days. Then wrap green tape around the wire.
For the fantasy flowers: cut white 26-gauge wire into 3 pieces and bend the top. Take 3 black stamens and fold in half. Hook this around the wire and push it into place. Take a piece of green tape and use it to wrap the stamens to the wire. Take a piece of gum paste and roll out on Magic Roll-Out Powder. Cut out flowers with the flower cutter and push them into the veiner. Thread the black headed iron wires through the center of the flower and secure by twisting some gum paste around the pestle. Hang them on the drying rack and let them dry for 1 day, preferably 2 days. After this, wrap it again with green tape.
For the stamper: Cut white 26-gauge wire into three pieces and bend the top. Take 5 Wilton stampers and fold them in half, hook them around the wire and secure with green tape. Blush the tips of the pistils with the red dust.
For the branches: wrap 18 gauge wire all the way with brown tape, bending the wire here and there for a whimsical shape. After 1 to 2 days of drying time, give the flowers all a blush on the edges with the red dust. Use a flat brush for this.
Preheat the oven to 180°C (convection oven 160°C).
Prepare 400 g of FunCakes Mix for Sponge Cake Deluxe as indicated on the package. Divide the batter over the three baking pans of 10, 15 and 20 cm and bake them for about 30-35 minutes. Let them cool down by using a cooling grid.
Prepare 400 g of FunCakes Mix for Buttercream as indicated on the package. Season with a flavor paste of your choice. Fill the cakes with the buttercream and stack them over 3 cakes on top of each other.
Mix 500 g black fondant and 250 g white fondant. Knead lightly but not well to get the marbled effect and use it to cover the bottom cake. Color 600 g white fondant light pink and use it to cover the top two cakes.
Use the fondant that you have left for the geofigures. Color 150 g of fondant with the ivory coloring. Roll out the black/ white, ivory and pink fondant, give the ivory and white fondant a design by pressing the impression mats on it and cut out shapes with the Hexagon cutter. Stick the smallest cake completely full with the molds. You cover the second cake randomly at your own discretion.
Make edible paint by mixing the golden dust with rejuvenator and follow the lines on your black marbled cake. Let dry and then stack the three cakes on top of each other.
Prepare a small portion of FunCakes Mix for Royal Icing according to the instructions on the package and color it light pink. Put a little on the top cake and arrange the flowers and twigs in it. Cut the wire if it is too long. Along the edge of the cake you also put some icing and arrange some flowers as well. Finally, you cut a brown branch here and there.
