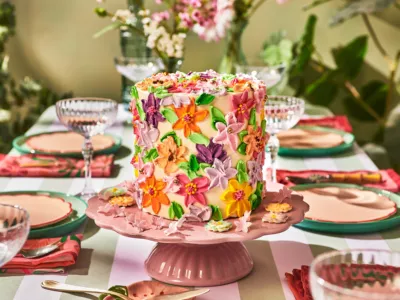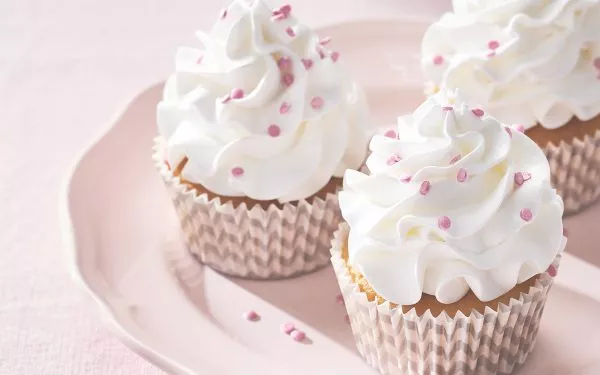


Fairy cake with dried flowers
Step into a fairytale world with dried flowers. This beautiful Fairy cake is decorated with a silky cream and delicate edible dried flowers, making it look like a small work of art.
What you need to make your fairy cake with dried flowers:
Ingredients
- 330 FunCakes Mix for Sponge Cake Deluxe
- 150 g FunCakes Mix for Enchanted Cream®
- 200 g FunCakes Sugar Paste Bright White
- 150 g FunCakes Sugar Paste Maroon Brown
- 100 g FunCakes Sugar Paste Stone Grey
- 100 g FunCakes Deco Melts White
- FunCakes Food Colour Gel Pink
- FunCakes Food Colour Gel Peach
- FunCakes Flavour Paste White Choco
- FunCakes Bake Release Spray
- 5 eggs (approx. 250 g)
- 133 ml water
- 100 ml milk
- Apricot jam
Necessities
- FunCakes Decorating Bags
- FunCakes Cake Cartons Gold/Silver Round 15 cm
- Wilton Dowel Rods Plastic set/4
- Wilton Decorating Tip #1M Open Star
- Wilton Decorating Tip #012 Round
- Wilton Cake Leveler 25 cm/Cake Leveler
- Wilton Recipe Right Non-Stick Cooling Grid 40x25 cm
- Wilton Basic Turntable for Cakes
- Wilton Comfort Grip Spatula Corner 22.5 cm
- 2x Wilton Extra Deep Round Baking Mould Ø 15 x 10 cm
- The Baked Studio Dried Flower Box - Deluxe Rainbow Pastels
- The Baked Studio Dried Flower Box - Deluxe Cool Blues, Lilac, Pink & White
- The Baked Studio Dried Flower Box Bunny Tails Pink / White / Lilac
- PartyDeco Cake Toppers Butterflies 9 x 6.5 cm
- PME Plain Edge Extra Tall Side Scraper
- FMM Impression Mats 1 Brick wall/tree grain
Preheat the oven to 180°C (convection oven 160°C) and grease the baking pans with baking spray.
Prepare 330g FunCakes Mix for Sponge Cale Deluxe as indicated on the packaging. Bake in two Wilton Extra Deep Round Baking Moulds and cool on the Wilton Recipe Right Non-Stick Cooling Grid.
Using the Wilton Cake Leveler, carefully slice each biscuit cake twice horizontally, creating three even layers per cake. Cut a FunCakes Cake Carton Gold/Silver Round just slightly smaller than your biscuit layers. Trim a hole in the center large enough to fit a Wilton Plastic Dowel Rod. This carton will be placed in the middle layers to help distribute the cake’s weight.
Attach Wilton Decorating Tip#012 Round to a FunCakes Decorating Bag and fill with Enchanted Cream®. Add a touch of FunCakes Flavouring Paste White Choco for a rich flavor. Tint some cream pink and peach using FunCakes Gel Colouring Pink and Peach for a subtle color effect
Place your first biscuit layer on the cake carton base. Apply a generous layer of cream using the FunCakes #012 Decorating tip. On the next layer, apply a cream border along the edges and smear a thin layer of apricot jam inside the border. Repeat for all layers, inserting the cake carton roughly in the middle. Once stacked, push a Wilton Dowel Rod through the center all the way to the base, then cut to size to stabilize the cake and prevent sliding.
Position your cake on the Wilton Basic Turntable for Cakes. Use the Wilton Comfort Grip Spatula Corner (22.5 cm) to spread a smooth, even layer of cream around the cake. Use the PME Plain Edge Extra Tall Side Scraper to pull and smooth the sides tightly.
Take small pieces of FunCakes Sugar Paste Maroon Brown and stone grey, and knead them together with FunCakes Sugar Paste Bright White to create a marbled effect. Roll out the brown Sugar Paste and texture it using the FMM Impression Mats Tree Grain design. Cut two doors from this textured Sugar Paste and gently adhere them to the sides of the cake.
Form small balls from the marbled Sugar Paste, flatten them into ‘pebbles’ and attach these around the doors for a rustic effect.
Hoewel dit gedroogde bloemen zijn, moet je ze niet direct in de taart steken. Doop de stelen in gesmolten chocolade of FunCakes Deco Melts om te voorkomen dat er stukjes in de taart vallen!
Fill a clean FunCakes Decorating Bag with the remaining cream and fit the Wilton Nozzle #1M Open Star. Apply a beautiful cable border or small cream tufts along the top edge of the cake. If there’s enough cream left, apply a scalloped edge along the bottom of the cake as well.
Decorate the cake with dried flowers from The Baked Studio Dried Flower Boxes (Deluxe Rainbow Pastels, Cool Blues & Bunny Tails) by dipping the stems in melted FunCakes Deco Melts White. This seals the stems and prevents dry flower shreds from falling into the cake. Pierce flowers into the cake rim and insert PartyDeco Cake Toppers Butterflies intermittently for a whimsical, natural finish
Although these are dried flowers, don’t stick them directly into the cake—stem shreds can fall in. Always dip the tips in Deco Melts or melted chocolate first!