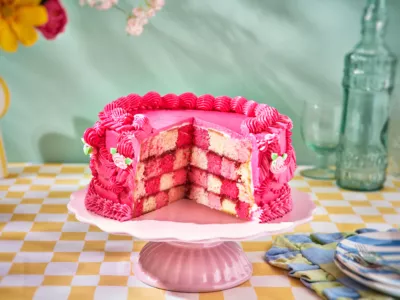


Sugarsheet cake
Take the small cookie cutter and cut out four circles, these being the inner leaves. Stick one leaf with a little piping gel around the styrofoam ball, fold it completely around so that you no longer see the ball. Place the remaining leaves on a foam pad and thin the edges using the ball tool. Curl the top edges slightly and place them in a spoon to dry.
What you need to make your sugarsheet cake:
Ingredients
- 400 g FunCakes Mix for Sponge Cake Deluxe
- 200 g FunCakes Mix for Swiss Meringue Buttercream
- 400 g FunCakes coloured sugar pink
- 400 g FunCakes gum paste white
- FunColours Gel pink
- FunColours Sparkle Dust Golden Ginger
- FunColours Dust Pink Rose
- FunColours Dust Chili Red
- FunCakes glucose syrup
- FunCakes piping gel
- Sugarflair rejuvenator spirit
- 440 g unsalted butter
- 180 ml water
- 6 eggs (aprox. 300 g)
- Jam
Necessities
- FunCakes Cake Carton Ø 15 cm
- FunCakes Magic Roll-Out Powder
- FunCakes Bake Release Spray
- Wilton Decorator Preferred® Baking Pan Ø 15 cm
- Wilton Decorator Preferred® Baking Pan Ø 20 cm
- Wilton cooling grid
- Wilton cake leveler - 25 cm
- Wilton -Wide Glide- rolling pin with rings 22,5 cm
- Wilton -Wide Glide- rolling pin 50 cm
- Wilton plastic dowel rods set/4
- Wilton decorating brush set/5
- Wilton parchment paper
- PME Mexican Foam Pad
- PME Ball modelling tools
- Culpitt floral wire white 18 gauge
- Cookie cutter Ø 4 à 5 cm
- Cookie cutter Ø 5 à 6 cm
- Styrofoam ball 4 cm
- Glue gun
Start by making the rose. Attach an 18-gauge floral wire with a glue gun to the styrofoam ball. Knead the gum paste well and colour with the pink FunColours Gel. Roll it out very thinly on a with Magic Roll-Out Powder covered work surface.
The rose needs two days to dry, so make sure to prepare it on time.
Take the small cookie cutter and cut out four circles out of the gum paste, this being the leaves. Attach one leaf with a bit of piping gel to the styrofoam ball, fold it completely around so that you don’t see the ball anymore. Place the other leaves on the foam pad and thin the edges by using the ball tool. Fold the uper edges a bit and place them in a spoon to dry.
Let the leaves dry in the spoon for 30-45 minutes while you go on preparing the other leaves.
Take the remaining gum paste and roll it out very thinly again. Cut out 21 leaves with the large cookie cutter. Thin the edges of the leaves again and let them dry in spoons.
Now take the three leaves out of the spoons and glue them with some piping gel around the styrofoam ball with the first leaf. Make sure the leaves are at the same height as the first leaf and place them roof-wise around one another. Repeat this with a row of 5 leaves, then with 7 and finally with a row of 9 leaves.
Make sure not to use too much piping gel to prevent the leaves from shifting.
Mix some pink dust with a little bit of red dust and carefully add it to the edges of the rose giving it a bit more detail. Cut the floral wire. Let the rose dry for at least 2 days.
Preferably let it dry hanging upside down. For example on a lamp!
Make the sugar sheets in 2 parts. For the bottom layer of the cake, you need 220 g of coloured sugar. Add 1 ½ tablespoon of glucose syrup to the sugar. Knead together until all the sugar grains are covered with glucose. Pour this onto a sheet of baking paper and gently flatten it with a rolling pin. Once it’s flat, carefully roll it out into an elongated shape. Make sure not to use too much pressure while rolling it out. For the upper part of the cake, you need 180 g of coloured sugar. Add 1 tablespoon of glucose syrup and repeat the above steps. Let this dry overnight.
The sugar sheets should dry overnight. Take this into account as well.
Preheat the oven to 180°C (convection oven 160°C).
Prepare 400 g of FunCakes Mix for Sponge Cake Deluxe as indicated on the package. Grease the baking pans with Bake Release Spray and divide the batter into the two baking pans. Bake the sponge cakes for 30-35 minutes in the middle of the preheated oven. Let them cool down completely on a cooling grid.
Isn’t your oven big enough to bake two sponge cakes at once? No problem, you’re perfectly fine baking one cake after the other. Just mix the batters for the two cakes separately as well. If you leave the sponge cake batter for too long before baking it, it will loose the air. And we don’t want that! For the quantities of the single cakes, check our quantity table.
Prepare 200 g of FunCakes Mix for Swiss Meringue Buttercream as indicated on the package. Colour the buttercream pink with the FunColours Gel.
Cut the sponge cakes in half twice and fill with a jam of your choice and the Swiss Meringue Buttercream. Cover the edges of the cake with a nice layer of buttercream as well and place the cakes in the fridge in order for the cream to stiffen.
Time for a did-you-know! Swiss Meringue Buttercream is often is abbreviated with SMBC.
Assemble the cake using a cake carton and the dowels. Carefully take the sugar sheets off the parchment paper and fold them around the cakes. Mix the golden ginger dust with some rejuvenator spirit, using it to paint the egdes of the sugar sheets. Place the rose on top of the cake right before serving it.