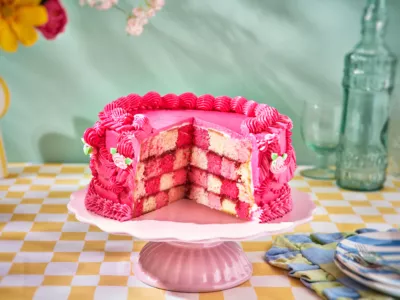
Checkerboard Lambeth cake
This Lambeth checkerboard cake combines two cake trends in one creation! Inside, you’ll find a colorful checkerboard cake, while the outside is decorated with vintage-inspired Lambeth buttercream piping. This cake is perfect for birthdays, garden parties and other summer celebrations.
Was Sie brauchen, um Ihre checkerboard lambeth cake:
Zutaten
- 1 kg FunCakes Mix for Sponge Cake Deluxe
- 400 g FunCakes Mix for Buttercream
- FunCakes Food Colour Gel Pink
- FunCakes Food Colour Gel Bright Green
- 16 eggs (approx. 800 g)
- 500 g unsalted butter
- 500 ml water
- Strawberry jam
Notwendigkeiten
- FunCakes Bake Release Spray
- Wilton Decorator Preferred Deep Round Cake Pan Ø20x7,5cm
- Wilton Recipe Right Non-Stick Cooling Grid 40x25cm
- Wilton Cake Leveler 25cm
- Wilton Standard Adaptor/Coupler (multiple)
- Wilton Decorating Tip Open Star #4B
- Wilton Decorating Tip Petal #104
- Wilton Decorating Tip Open Star #022
- Wilton Decorating Tip Open Star #018 (Multiple)
- Wilton Decorating Tip Open Star #032
- Wilton Decorating Tip Leaf #352
- Patisse Adjustable Baking Frame Round 13-31cm
- Patisse Cookie Cutter Rings set/14
Preheat the oven to 180°C (convection oven 160°C) and grease the baking pans with baking spray.
Prepare the FunCakes Mix for Sponge Cake Deluxe using 250 g mix, 4 eggs and 25 ml water per batch, as indicated on the packaging. Colour three batches with the FunCakes Food Colour Gel Pink, with each batch having a noticeably darker shade than the previous one. Don’t colour one batch. Bake the 4 sponge cakes for 30-35 minutes until fully baked. Turn the cake onto a cooling rack and allow it to completely.
Prepare 400 g FunCakes Mix for Buttercream as indicated on the packaging. Remove two small portions of buttercream from the bowl. Colour one portion green and the other a very pale pink. Colour the remaining buttercream a deep dark pink.
Using a cake leveller, cut each sponge cake into three even layers. For this cake, you will only use the middle layers from all four sponge cakes.
Tip: Don’t throw away the leftover sponge cake. Use it to make a delicious trifle or Cake Bowl with fresh fruit, Enchanted Cream® flavoured with flavour paste, chocolate and your favourite toppings.
Cut 3 rings and 1 centre from each sponge cake layer using cutters or cake rings of different sizes. Then mix and match the colored rings to create new sponge cake layers, placing a different colour ring inside each larger ring. Repeat for all layers. You should now have 4 multi-colored sponge cake layers with a different pattern in each layer.
For this cake, you will need three cutters in the sizes 15 cm, 10 cm and 5 cm. These sizes allow you to cut three rings and a centre circle. It is important that each cutter is 5 cm smaller than the previous one.
Spread a very thin layer of strawberry jam onto one sponge layer and place the next layer on top. Make sure that when stacking the layers, you do not place two identical colours on top of each other. Spread a thin layer of jam between each layer.
Cover the entire cake with a thin layer of pink buttercream. You should still be able to see the cake through it. This is your crumb coat. Allow it to firm up in the refrigerator for 30 minutes. Then apply a second coat of buttercream and chill again until firm.
Place the pale pink buttercream into a decorating bag fitted with a coupler and tip #018. Pipe small rosettes onto a sheet of baking parchment and place them in the freezer until completely firm.
Fill a decorating bag fitted with tip #104 with some of the dark pink buttercream. Pipe a ruffled border around the bottom edge of the cake. Hold the wider side of the tip against the cake and use a gentle up-and-down motion. Pipe a shell border above it using tip #022.
Using tip #018, pipe garlands around the cake. Above these, pipe small stars using the same tip (#018). Pipe another ruffled border underneath the garlands with tip #104. Use tip #003 to add small dots beneath the garlands. Pipe a shell where the garlands meet using tip #4B.
Use tip #104 to pipe a ruffled border around the top edge of the cake and finish it with a shell border using tip #4B. Place the cake in the refrigerator and allow it to firm up completely.
Once the small rosettes are frozen solid, carefully remove them from the baking parchment. Attach them underneath the large shell that connects the garlands using a little buttercream. Pipe small leaves around the rosettes using the green buttercream and tip #352.
Work quickly, otherwise the rosettes may start to melt from the warmth of your fingers.
Store the cake in the refrigerator and remove it about 30 minutes before serving.